6 Steps To Soldering Earring Posts

Learn how to solder earring posts on blanks or other ornaments in this 6-step how-to guide to get you started. We cover every aspect of the process plus it’s loaded with tips!
Soldering your own posts can open you up to a whole new set of designs and creations. In this step-by-step guide, I will show you how to set up your soldering station, where to aim the flame, plus, give you tips on how to remove the extra solder during the finishing step. For this project I have used a standard double notched earring post and a small heart blank.

You can find the materials & supplies list at the end of this article.

Step 1: Prepping the Pieces

Halstead Soldering Posts-step 1
Prepping is crucial before you solder. To remove dirt and oil from your fingertips, use 600 or 800 grit sandpaper and lightly clean the surface where you will be soldering.

Tip

After sanding do not touch that area. At this point I transfer small pieces between stations using tweezers.

Step 2: Soldering Set-up
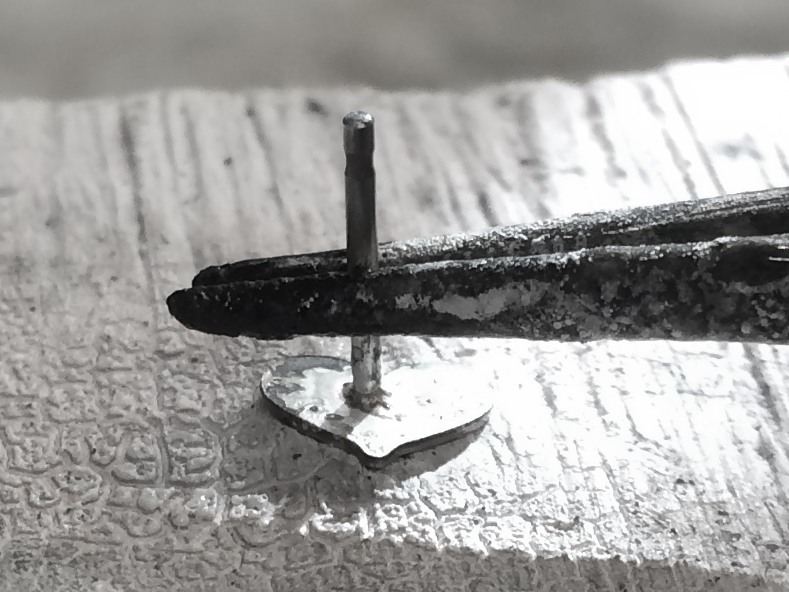
Halstead Blog - Soldering Posts- Step 2
The post is a small, thin piece of metal so it’s important that you keep heat away from it as much as possible. If you don’t, the top of your post can quickly melt. Since stainless steel absorbs heat, the 3rd hand is protecting the top of the post by acting as a heat sink.

Tip

If I were to place the jaws lower down on the post, it wouldn’t allow the post to get hot enough to help the solder flow. Too high and I would be exposing the fragile post.

Step 3: Applying the Flux

Halstead Blog - Soldering Posts - Step 3
Flux your piece! Use it generously because it protects your piece from firescale, which means less clean-up at the end. After you have fluxed, add a tiny piece of medium solder adjacent to where the post and blank meet.

Tip

Everybody has a preference when it comes to flux so we keep a paste and a spray in our jewelry studio at all times. I like to use the paste on small pieces and the spray on large pieces. Flux can cause build-up on soldering boards if you use too much.

Step 4: The Flame

Halstead Blog - Soldering Posts - Step 4
I always use the smallest  possible torch tip when soldering posts. You will want to concentrate your flame on the blank and not on the post right away. In any piece that you solder, you should always heat the largest area first. After it’s hot and just before the solder flows, you can move your flame to heat the smallest piece as well.

Tip

Notice where the solder piece is positioned relative to the flame. Solder flows toward the heat source. So, by having the solder on one side of the post and the flame on the opposite side, the solder will flow towards the flame and right into the join.

Step 5: Pickling

Halstead Blog - Soldering Posts - Step 5
Now that the solder has flowed, drop it into a pickle pot until it’s clean. Quench it in water and dry it.

Tip

Before dropping it into your pickle pot, let it cool down for several minutes. The bubbles created when dropping it straight into the pickle can actually pop the pieces apart.

Step 6: Finishing

Halstead Blog - Soldering Posts - Step 6
There are lots of ways to finish your piece. None of them are wrong, but some methods are faster than others. You can use sandpaper running through the 320-3000 grits or you can use a rotary tool. Take care when finishing small pieces like this so they do not go flying across your studio. Safety glasses are a must! I prefer to use a Flex Shaft with a sandpaper attachment to remove the extra solder. Then, I polish with 3M radial disks starting with yellow and working my way down to light green. I recommend tumbling it for 10 minutes.

Tip

The post shown has the sterling silver (.925) mark on it. Make sure you don’t remove this while finishing your piece. I use flat nose pliers to protect it when I’m finishing the piece.


Materials:

  • 1 = S1236 Sterling Silver Post, .9mm Post Thickness (Item #: S1236)
  • 1 = SL252 Sterling Silver 7x5mm 24ga Small Heart Blank (Item #: SL252)

Supplies:

  • Flux
  • Jewelry Torch
  • 3rd Hand Tweezers
  • Quench Bowl
  • Copper Tongs
  • Soldering Pick
  • Medium Solder
  • Soldering Board
  • Pickle & Pickle Pot
  • Sandpaper (600 or 800 Grit)

Optional:

  • Sandpaper disk
  • 3M Radial Bristle Disks
  • Rotary Tool (Flex Shaft or Dremel)

Once you’ve mastered soldering posts onto blanks, have fun shopping at LatestJewelry.com for a wide array of jewelry findings you’ll want to solder together in your next post creation! Remember, you can often alter charms by using wire cutters to remove the hanging loop and filing away any remaining burs. They make great posts!